Quickstart
If you need help setting up, contact us at [email protected].
1. Install Fishbowl on each device
There are two ways to install Fishbowl:
Option A: App Store (recommended for small deployments)
On each device, search for Fishbowl Meeting Rooms, or visit the
You can also install the APK manually if you do not have access to the Play Store or have an unsupported device. See Manual Android Installation for instructions.
Option B: QR Provisioning (recommended for fleet deployments)
For deploying multiple Android devices, you can use a QR code to automatically install Fishbowl, enable kiosk mode (Device Owner), and link the device to your account in one step.
- Log in and go to Add Device. Select Provision and link a modern Android device
- Optionally enter a room name and configure Wi-Fi credentials. Select your Android version
- Factory reset each Android device, tap the same spot 6 times on the welcome screen, and scan the QR code
- The device will install Fishbowl and appear in your account automatically
Leave the room name empty to reuse the same QR code for multiple devices. See Requirements: Fleet Deployment for more details.
2. Calendar/Resource Configuration
A resource or calendar needs to be configured for each meeting room. View the configuration instructions for your calendar provider below.
- Microsoft 365 (Exchange Online)
- Microsoft Exchange (on-prem)
- Google Workspace (G Suite)
- Gmail (personal)
- Teamup
3. Set up the Fishbowl App
3.1. Android and Amazon
If you used QR provisioning (Option B above), your devices are already linked to your account. Skip to the confirmation step.
For devices installed from the app store or APK, link them using a linking code:
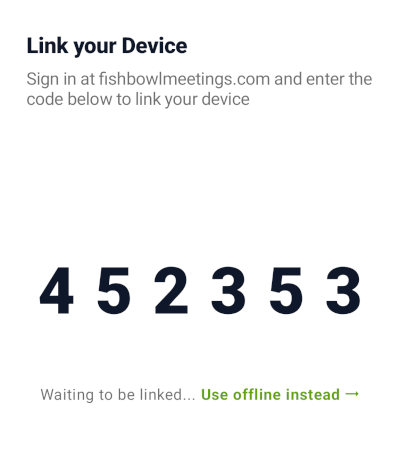
- Open the Fishbowl app on the device. A six-digit linking code will appear.
- On a computer, log in to your Fishbowl account and go to Add Device. Select Link another device.
- Enter the linking code and a room name, then click Add Device.
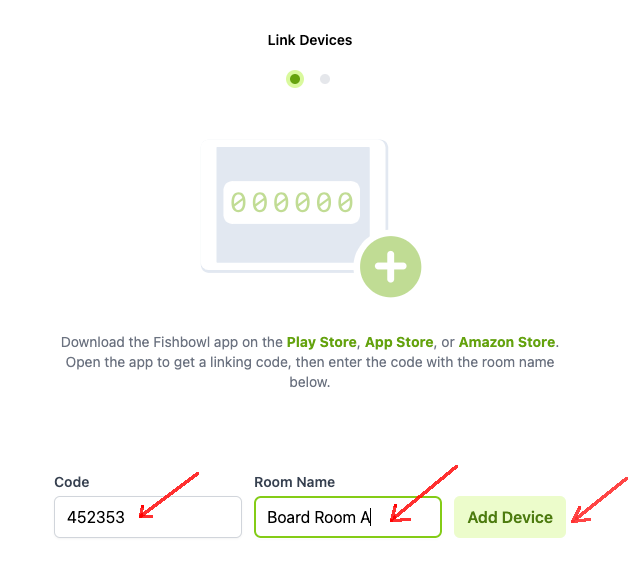
- You can link multiple devices at the same time. Keep entering codes and pressing Add Device. When all devices are linked, click Link Devices to Account.
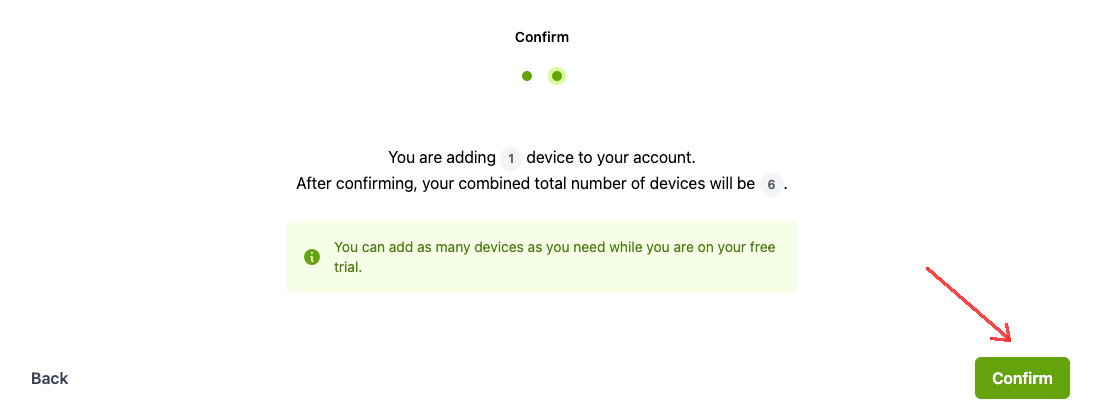
- A confirmation screen will be shown. If you have a paid account, a quotation will be displayed. Click Confirm to add the devices to your account.
After confirmation, you'll configure your calendar, branding, and settings through the setup wizard. These settings are applied to all devices you just linked.
- Follow the instructions for your calendar type: Microsoft 365 | Google Workspace | Microsoft Exchange | Gmail | Teamup
- Customize Fishbowl with your room name, logo, and other settings.
- To change the settings again, tap on the logo, and select
Change Settings. You can also restart the setup wizard by selectingSetup Wizard
3.2. iOS (iPad)
- Log in with your Fishbowl account. This is the same account that you sign in with at fishbowlmeetings.com/login
- Select your calendar type and tap Next
- Follow the instructions in the
Configure Fishbowlsection of your calendar type. - Customize Fishbowl with your room name, logo, and other settings.
- To change the settings again, tap on the logo, and select
Style Settings. You can also restart the wizard by selectingReconfigure Device
Lock the iPad to Fishbowl: use Guided Access so users cannot leave the app. On Android, set up Kiosk Mode.